hot tub

Hot Tub Covers 101: Which Type Is Best for Your Backyard Spa?Hot Tub Covers 101: Which Type Is Best for Your Backyard Spa?

Buying a hot tub cover may seem simple at first, but most homeowners quickly realize that it’s a bit trickier than grabbing the first one on sale. Each cover has its perks, drawbacks, and quirks. Exploring the many types of hot tub covers can help you make sense of the options without getting lost in a pile of marketing claims. Let’s break it all down so your spa stays safe and your stress level stays low.

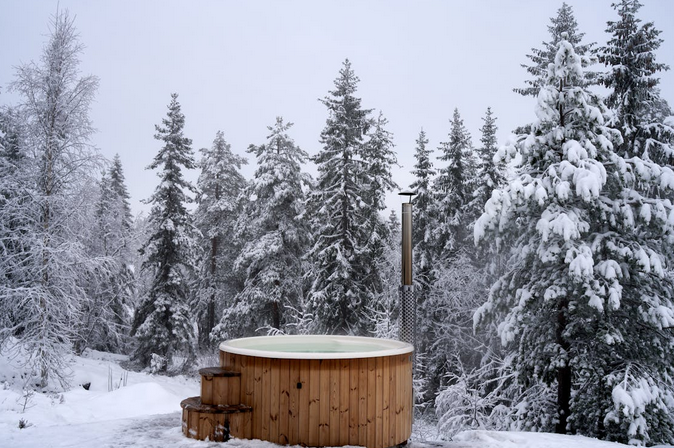
Traditional Foam Covers for Everyday Durability

Foam covers are the classic choice for most hot tub owners. They help maintain heat and keep out leaves, dust, and the occasional rogue critter. Their insulation makes them suitable for colder climates, and the price point is typically manageable. Many people appreciate the balance of strength and simplicity. These covers come in various thickness levels. Thicker models lock in heat better, though they weigh more. Over time, foam covers can absorb moisture, but proper care slows that process.

Hard Covers for Tougher Weather and Extra Security

extreme weather

Hard covers give you an added layer of protection. They stand up well against heavy snow, fallen branches, and unexpected backyard accidents. If you have energetic pets, these covers can help keep them away from the water. They’re also appreciated by families who want an extra safety measure. This option tends to be pricier, but it offers strong long-term value. Hard covers resist sagging better than softer types. They also provide a crisp, polished look that blends nicely with modern backyard setups. The weight can be a challenge, but a lift system solves that for most people.

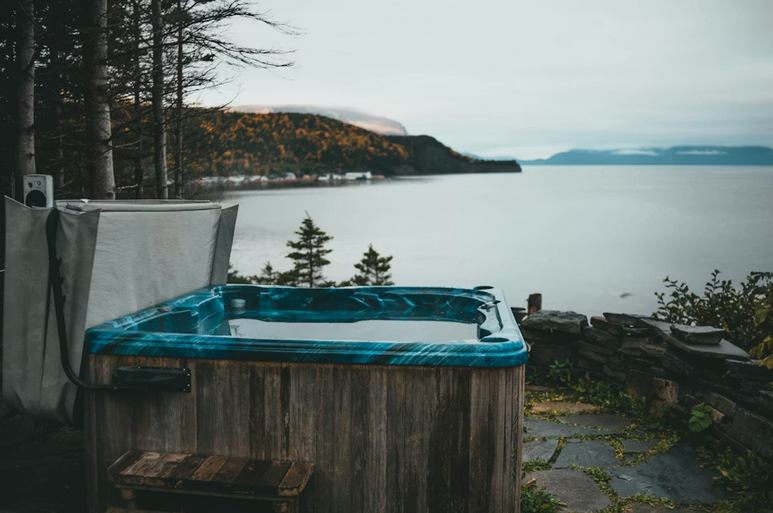
Soft Vinyl Covers for Quick, Lightweight Use

Soft vinyl covers appeal to homeowners who want something easy to remove in seconds. They work well for warm climates where insulation isn’t the top priority. These covers act as a simple shield against debris and insects. They’re especially popular for above-ground tubs that are often used. Vinyl covers require regular cleaning to stay in good shape. They’re not the strongest option, but their lightness feels convenient. If you prefer something you can manage with one hand, this might be your match. Just be sure it fits snugly so it doesn’t flap around during windy evenings.

Roll-up Covers for Fast Operation

tub cover

Roll-up covers are efficient and surprisingly fun to use. With a quick twist, the material rolls neatly to one side, making access fast. They’re ideal for people who use their tub frequently and dislike heavy lifting. The mechanism keeps things smooth and tidy. These covers tend to be slim and uncomplicated. They don’t have the insulation power of foam or hard covers, but for many hot-tubbing habits, that trade-off is fine. They shine in mild climates where heat loss isn’t a major hurdle. Their sleek design also makes storage effortless.

Choosing a hot tub cover doesn’t have to feel overwhelming. Focus on how often you use your spa, your climate, and how much effort you want to put in. Once those pieces fall into place, the right cover becomes much easier to spot. Then you can sit back, relax, and enjoy your backyard retreat without extra hassle.…

Home
seats

Creating a Private Backyard Retreat Without Breaking the BankCreating a Private Backyard Retreat Without Breaking the Bank

There’s something special about having your own quiet escape just steps from your back door. Whether it’s a cozy spot to read a book, a place to entertain friends, or simply a peaceful area to unwind after a long day, a private backyard retreat can make a huge difference in how you enjoy your home. The good news? You don’t need a luxury budget to create it. With a little creativity and a few smart choices, you can turn your yard into a secluded haven without overspending.

Make the Most of What You Already Have

chairs

Before you start buying anything new, take a good look at your current space. You might already have features that can be repurposed or refreshed. A weathered fence might just need a coat of paint, or that unused corner of the yard could be transformed with a few plants and some string lights. Sometimes, it’s not about adding more—it’s about reimagining what’s already there.

Choose Smart Solutions for a Tight Budget

When it comes to budget-friendly ways to add backyard privacy, there are more options than you might think. Tall grasses or fast-growing hedges can create natural screens without the cost of a full fence. Lattice panels, especially when paired with climbing vines, offer both privacy and visual interest for a fraction of the price of traditional fencing. Even hanging outdoor curtains from a pergola or DIY frame can make a big impact while keeping things affordable. These low-cost ideas not only enhance seclusion but also add charm to your outdoor space.

Use Plants as Natural Privacy Screens

lush green

Plants are one of the most attractive and functional ways to create privacy. They soften the space, provide shade, and help reduce noise from neighbors or nearby streets. Consider bamboo, boxwood, or tall ornamental grasses for quick coverage. For smaller areas, potted plants can be grouped strategically to shield a patio or seating area. With the right placement, greenery can work just as well as a fence—sometimes better.

Create Zones for Better Use of Space

Even in a small yard, dividing the area into zones can make it feel more organized and private. You might have a seating nook in one area, a garden bed in another, and a grill or dining setup in the back. Using outdoor rugs, planters, or low-cost structures like trellises or benches can help define each zone. The result feels more like a well-planned retreat than a random patch of grass, even if your budget is minimal.

Add Lighting for Ambience

string lights

Outdoor lighting doesn’t just help with visibility—it can completely transform the vibe of your yard. Soft string lights, lanterns, or solar-powered pathway lights make the space feel warm and welcoming. They also encourage relaxation after dark, allowing you to enjoy your backyard well into the evening. Good lighting adds a layer of ambiance that makes any space feel more intentional, private, and cozy—without needing a major investment.

Creating a private backyard retreat doesn’t have to involve a complete overhaul or a big budget. By focusing on simple upgrades, clever layouts, and thoughtful design choices, you can build a space that feels personal and peaceful. Whether you’re working with a tiny patio or a full-sized yard, there are countless ways to enhance privacy and comfort without spending a fortune. Your perfect backyard escape might be closer—and more affordable—than you think.…

Home
green

Passive House Design Principles That Lower Your Energy BillsPassive House Design Principles That Lower Your Energy Bills

Building a home that uses minimal energy starts with smart design choices. Westdeutsche Zeitung talks about how passive house principles can dramatically reduce heating and cooling needs. By focusing on insulation, airtightness, and natural energy sources, homeowners can cut bills while living comfortably.

High-Performance Insulation

woman Insulation is the backbone of any passive house. Thick walls, roofs, and floors prevent heat from escaping during winter and keep interiors cool in summer. This approach dramatically lowers reliance on heating systems and air conditioners, saving money every month. Homeowners also notice improved indoor comfort with consistent temperatures. It’s like wrapping the house in a protective cocoon. Choosing eco-friendly insulation materials can further reduce environmental impact while maintaining effectiveness.

Airtight Construction

Preventing drafts is just as important as having insulation. Airtight seals around windows, doors, and walls block uncontrolled airflow that can spike energy use. It also improves indoor air quality, as controlled ventilation can filter dust and allergens. A tight envelope allows heating and cooling systems to work efficiently without overcompensating for leaks. Even small gaps can make a noticeable difference in energy consumption. Paying attention to these details during construction avoids costly adjustments later.

Heat Recovery Ventilation Systems

Even airtight homes need fresh air. Heat recovery ventilation systems bring in outdoor air while capturing heat from outgoing air. This method keeps indoor air fresh without losing energy through ventilation. The systems can also regulate humidity, preventing mold growth and improving comfort. Over time, the energy savings from controlled airflow can be substantial. It’s a solution that combines efficiency with health benefits.

Strategic Window Placement and Shading

window

Windows are more than just aesthetic; they control heat gain and natural lighting. South-facing windows capture winter sun, while properly designed shading prevents overheating in summer. This balance reduces dependence on electrical lighting and cooling systems. High-performance, double or triple-glazed windows amplify these benefits. They trap warmth during cold months and resist heat during summer. Integrating shutters or overhangs can add another layer of energy efficiency.

Passive Solar Design

Orientation and building shape can reduce energy demands significantly. Passive solar design uses sunlight to naturally heat spaces and illuminate interiors. Simple strategies, like positioning living areas toward the sun, can lower the need for artificial heating. Thermal mass, such as concrete or stone floors, stores daytime heat for evening use. The result is a home that feels comfortable year-round without relying heavily on mechanical systems. Even small design tweaks can have a big impact on bills and sustainability.

Efficient Lighting and Appliances

small 
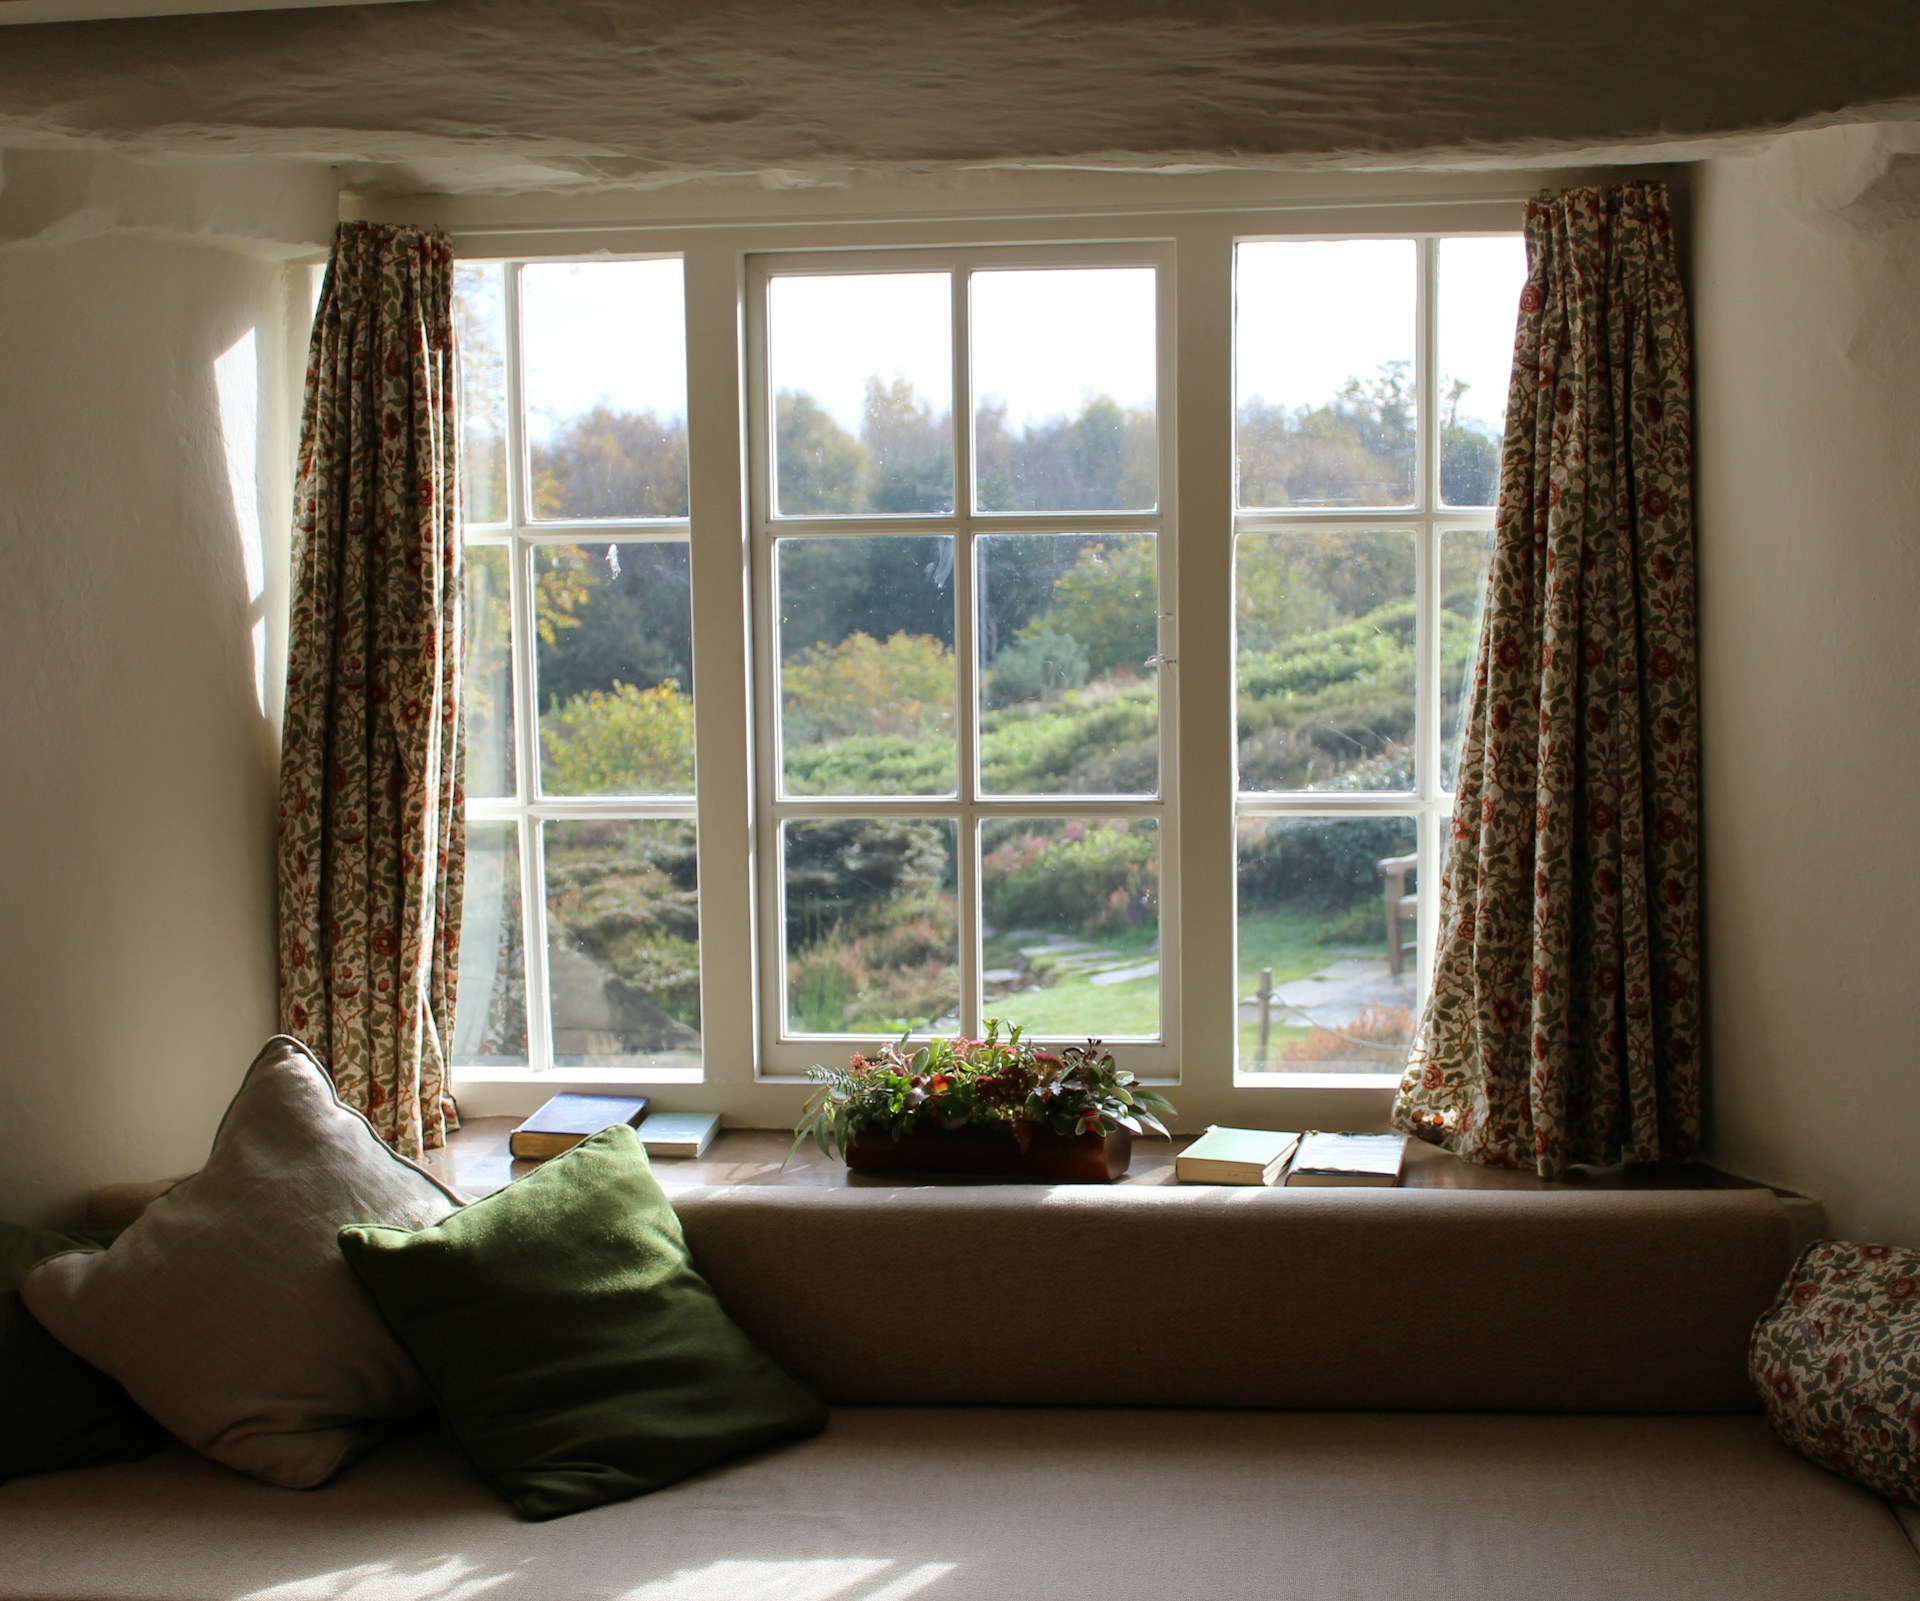
Energy-efficient lighting and appliances complement passive house design. LED bulbs, low-energy fixtures, and smart home appliances reduce electricity consumption without sacrificing convenience. This approach ensures that the home’s energy performance is maximized alongside its structural efficiency. Modern appliances with high energy ratings also last longer and cost less to operate over time. Combining these with automated systems, like motion-sensor lights, further cuts unnecessary usage. It’s a practical step that fits seamlessly into sustainable living goals.

Implementing passive house principles transforms how homes use energy. From insulation and airtightness to smart window placement and ventilation, these strategies lower costs and improve comfort. By adopting these methods, homeowners create sustainable, practical living spaces that are friendly to both their budgets and the planet.…

Home
outdoor space

Backyard Fixes That Actually Make You Want to Go OutsideBackyard Fixes That Actually Make You Want to Go Outside

So you’ve got a backyard. Great. But let’s be honest. Right now, your landscape is probably more of a dumping ground for broken garden tools and sun-bleached plastic chairs than a relaxing retreat. Truth is, many homeowners delay backyard upgrades because it feels like a hassle. But the trick is to focus on small wins that make the space functional and enjoyable. And if you want it to look polished without turning into a DIY burnout project, hiring a local landscape professional can make a world of difference. You don’t need a complete overhaul, just smart choices that fit your space and your life.

Start With What You Actually Do Out There

Before you grab a shovel, think. Do you host friends? Grill on weekends? Let the kids loose like wild animals? Your outdoor layout should match your routine. No one needs an outdoor kitchen if you’re barely microwaving indoors. But a small deck and a few comfy chairs? Totally doable. Add a fire pit or a few lights and suddenly, your yard feels intentional, even if it’s still got patches of wonky grass.

Install Patio Covers (Even for Small Yards)

cover

Let’s talk shade. Because the San Diego sun is no joke. One of the best investments you can make is a solid patio cover. They’re not just about staying cool. A well-placed cover gives you an actual room outdoors. Somewhere to sip your morning coffee without squinting. Somewhere to sit during a surprise drizzle without bolting inside. Aluminum frames are easy to maintain. Fabric options give a softer vibe. There’s something for every budget. Just don’t go for something flimsy. You’ll regret it the minute it catches wind and turns into a backyard kite.

Plant Specific Plants

Skip the random plant haul from the weekend nursery trip. Instead, work with your space. Think about how much sun you get, how much you’re willing to water, and how often you’ll really trim things. Drought-tolerant plants like succulents, agave, and lavender look good year-round and don’t beg for attention. Group them by height and color to keep the setup feeling planned, not accidental. And if you don’t want to spend weekends pruning like some gardening monk, hire someone local. They’ll know what actually grows here and what’s going to turn into a withered stick by August.

Use Furniture That Can Take a Hit

Let’s be honest, outdoor furniture lives a hard life. Between sun, rain, and accidental spills, it needs to be durable more than trendy. Think weatherproof, easy to wipe down, and preferably something that won’t collapse when your cousin plops down a little too enthusiastically. You can always swap out cushions for color updates, but the frame should last longer than a summer fling.

Your backyard doesn’t need to look like a magazine spread. It just needs to feel like somewhere you actually want to spend time. Start with shade, seating, and a few plants that won’t die in a week. Make it a space that feels like part of your home. And if you’re stuck, call a pro who knows the lay of the land.…

Home
cabin builder

How to Build a Log Cabin: Step-by-Step GuideHow to Build a Log Cabin: Step-by-Step Guide

Imagine waking up in a cozy log cabin, surrounded by nature’s beauty. The scent of fresh pine fills the air as sunlight streams through your window. Building your own log cabin can turn this dream into reality. It’s a rewarding project that offers both challenge and satisfaction. However, designing the layout and understanding log sizing for cabin construction are not always easy. But don’t worry, we’ve got you covered with this step-by-step guide on how to build a log cabin. Whether you envision a rustic retreat or a modern getaway, creating a log cabin is an adventure worth embarking on. From selecting the perfect land to choosing materials, every step adds to the excitement.

Environment Considerations

Selecting the right land for your log cabin is crucial. Start by considering accessibility. You want a location that’s easy to reach but still offers privacy. Think about the landscape, too. Do you prefer a wooded area or an open field? Proximity to water can also enhance your experience, providing not just beauty but potential recreational opportunities.

Log Cabin Kit vs. Custom Build

construction

When it comes to building your log cabin, you face a key decision: choosing between a kit or opting for a custom build. Log cabin kits streamline the process. They come with pre-cut logs and detailed instructions. This can be a huge advantage if you’re looking to save time and effort. On the other hand, custom builds offer flexibility. You can design every aspect according to your vision, from layout to materials. If you have specific ideas in mind, this route allows for creativity and personalization. Cost is another factor to consider. Kits often provide predictable pricing, while customization might lead to unexpected expenses depending on your choices.

Foundation Options

There are several options to consider. A concrete slab is popular for its durability and low maintenance. It’s particularly effective in areas with stable soil conditions. Pier foundations provide another viable choice. These elevate your cabin off the ground, promoting better airflow and minimizing moisture issues from the soil below.

Roofing Choices

roofing

Metal roofs are popular for their durability. They can withstand harsh weather while requiring minimal maintenance. Asphalt shingles offer affordability and ease of installation. Wood shakes deliver a rustic aesthetic that blends beautifully with log structures. But most importantly, think about the local climate and aesthetics when making your decision.

Log Wall Construction

Log wall construction is a captivating process. It starts with selecting high-quality logs, which are often sourced from local timber. The choice of wood impacts not only aesthetics but also durability. Once you have your logs, preparation is key. Each log should be debarked and cut to the desired length. This ensures uniformity and allows for better insulation. Next comes the stacking phase. Logs are placed horizontally, interlocking at corners in a method known as saddle notching or dovetailing. These techniques create sturdy connections that enhance structural integrity. As you build up the walls, pay attention to gaps between logs.

Taking time to research and plan each phase makes all the difference. Whether you’re looking for simplicity through a kit or embracing creativity with a custom build, every decision shapes your vision into reality. With careful consideration and dedication, you’ll soon find yourself enjoying life in your very own log cabin sanctuary amidst the beauty of nature.…

Home

How to Research and Choose the Perfect Gated Community for Your NeedsHow to Research and Choose the Perfect Gated Community for Your Needs

Living in a gated community offers unique perks like enhanced security, privacy, and access to exclusive amenities. However, finding the perfect community that fits your lifestyle and preferences requires thorough research and planning. This guide will walk you through the key steps to help you choose the right gated community for your needs. For more information, visit https://wellingtonhometeam.com/pros-cons-buying-home-gated-community/.

Define Your Priorities

Before beginning your search, consider what matters most to you in a community. Are you prioritizing top-notch security, luxury amenities, or a serene environment? Maybe proximity to work, schools, or recreational areas is at the top of your list. Knowing what you value will help you focus your research on communities that align with your goals.

Start With Online Research

The internet is a great starting point for exploring potential gated communities. Websites like Zillow, Realtor.com, and community-specific pages offer detailed information on homes, amenities, and neighborhood features. Review photos, read descriptions, and explore online forums or social media groups where current residents discuss their experiences. These resources provide valuable insights before you visit in person.

Visit the Community in Person

While online research is helpful, nothing beats seeing a community for yourself. Schedule a visit to tour the neighborhood and take note of the environment. Are the streets well-maintained? Do the amenities, like pools or clubhouses, appear clean and functional? Visiting at different times of the day will also give you a sense of noise levels, traffic, and overall activity.

Speak With Current Residents

One of the best ways to get an honest perspective on a gated community is to talk to people who already live there. Ask about their experience with the homeowners’ association (HOA), the quality of amenities, and any challenges they’ve faced. Their feedback can reveal details you might not find in brochures or online descriptions.

Evaluate the HOA and Community Rules

Most gated communities are managed by a homeowners’ association, which sets rules and oversees maintenance. Take time to understand the HOA’s role and responsibilities. Ask questions like:

  • What are the HOA fees, and what do they cover?
  • Are there restrictions on home renovations, parking, or pets?
  • How does the HOA handle disputes or special assessments?

Ensure the HOA’s rules and costs align with your lifestyle and financial plans.

Assess the Location and Surrounding Area

A gated community’s location is just as important as the amenities within it. Look into the surrounding area to ensure it meets your needs. Is it close to work, schools, or medical facilities? What about grocery stores, shopping centers, and restaurants? Additionally, the safety and infrastructure of the neighborhood outside the community gates should be checked.

Review Property Value Trends and Resale Potential

Buying a home in a gated community is an investment, so it’s important to understand the market trends. Research how property values in the community have changed over the years. Are homes appreciating in value? Consult a local real estate agent for insights into the area’s resale potential and any factors that could influence property values, such as planned developments or zoning changes.

In Conclusion

Choosing the perfect gated community requires a thoughtful approach, balancing your personal needs with practical considerations like location, amenities, and financial commitments. By taking the time to research online, visit potential communities, and talk to residents, you can gain a comprehensive understanding of what each neighborhood offers.…

Home
roof

Comparing Rubber Roofing to Traditional Roofing Materials: What You Need to KnowComparing Rubber Roofing to Traditional Roofing Materials: What You Need to Know

Choosing the suitable roofing material for your home can feel overwhelming with so many options available. While traditional choices like asphalt shingles, metal, and tiles are common, rubber roofing has emerged as a popular alternative with unique advantages. If you’re trying to decide between rubber roofing and more conventional materials, this guide from the best residential roofing company will help you weigh the pros and cons to make an informed decision.

Understanding Rubber Roofing

Rubber roofing, often made from a synthetic material called EPDM (ethylene propylene diene terpolymer), is a durable, flexible, and weather-resistant option. It’s typically available in rolls or sheets, which makes it ideal for flat or low-sloped roofs. Rubber roofing has been used in commercial buildings for years but is becoming increasingly popular in residential settings.

Traditional Roofing Materials

shingles

Let’s briefly touch on some of the traditional roofing materials:

  • Asphalt Shingles: The most common roofing material, asphalt shingles are affordable, easy to install, and come in various colors and styles.
  • Metal Roofing: Known for its longevity and durability, metal roofing is resistant to extreme weather and is often made from aluminum, steel, or copper.
  • Clay or Concrete Tiles: These heavy-duty tiles are incredibly durable and offer a distinct aesthetic, often associated with Mediterranean or Southwestern-style homes.
  • Wood Shingles or Shakes: Made from cedar, redwood, or other types of wood, these shingles offer a natural look but require more maintenance to prevent issues like rot or insect damage.

Durability: How Does Rubber Roofing Compare?

Durability is a key factor when choosing a roofing material. Rubber roofing is highly durable, with a lifespan of 30 to 50 years when properly maintained. It’s resistant to extreme weather conditions, including heavy rain, snow, and UV rays, making it an excellent choice for areas with diverse climates.

In comparison:

  • Asphalt Shingles typically last 15 to 30 years. However, they can be damaged by high winds and may need more frequent repairs.
  • Metal Roofing offers excellent durability and a lifespan of 40 to 70 years. It’s resistant to fire, rot, and insect damage but can be noisy during heavy rain or hailstorms.
  • Clay or Concrete Tiles are highly durable and have a lifespan of 50 to 100 years. However, they are heavy and may require additional structural support.
  • Wood Shingles or Shakes: Generally last 20 to 40 years but require regular maintenance to protect against moisture and pests.

durable

Cost Considerations

Cost is another critical aspect to consider. Rubber roofing is generally more expensive than asphalt shingles but less costly than metal or tile roofing. The initial investment may be higher, but the long-term savings from reduced maintenance and repairs can make rubber roofing a cost-effective option.

Here’s a general comparison:

  • Asphalt Shingles: $3.50 to $5.50 per square foot installed.
  • Rubber Roofing: $6.00 to $10.00 per square foot installed.
  • Metal Roofing: $7.00 to $12.00 per square foot installed.
  • Clay or Concrete Tiles: $10.00 to $20.00 per square foot installed.
  • Wood Shingles or Shakes: $6.50 to $11.00 per square foot installed.

Environmental Impact

For those concerned about sustainability, rubber roofing stands out as an eco-friendly choice. Most rubber roofing is made from recycled materials. At the end of its lifespan, it can be recycled again. It also offers excellent insulation properties, which can help reduce energy consumption in your home.

In comparison:

  • Asphalt Shingles: Not exceptionally eco-friendly. They’re petroleum-based and difficult to recycle, contributing to landfill waste.
  • Metal Roofing: Highly recyclable and energy-efficient, making it a good option for eco-conscious homeowners.
  • Clay or Concrete Tiles: Made from natural materials and can be recycled, their production process is energy-intensive.
  • Wood Shingles or Shakes: These are renewable resources, but the treatment process to make them weather-resistant can involve chemicals.

Choosing the right roofing material depends on your specific needs, budget, and aesthetic preferences. Rubber roofing offers excellent durability, energy efficiency, and environmental benefits, making it a strong contender for many homeowners. However, traditional materials like asphalt …

Home

Vacation-Style Living: Designing a Dream Home That Feels Like a Permanent GetawayVacation-Style Living: Designing a Dream Home That Feels Like a Permanent Getaway

Imagine waking up every day to the serene ambiance of a vacation retreat, where relaxation and rejuvenation are part of your daily routine. Designing a dream home that embodies the essence of vacation-style living from the Hausbauhelden concept offers a unique opportunity to create a sanctuary that feels like a permanent getaway. Whether you’re envisioning a coastal cottage, a mountain chalet, or a tropical oasis, integrating elements of vacation-inspired design can transform your living space into a haven of tranquility and luxury.

Embrace Natural Beauty and Serenity

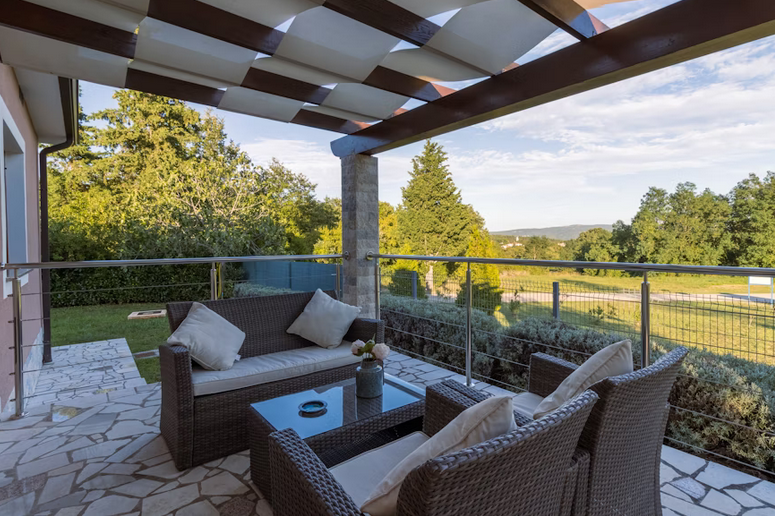
Vacation-style living revolves around embracing natural beauty and creating a sense of serenity within your home. Start by selecting a location that resonates with your ideal getaway, a coastal setting with panoramic ocean views, a mountain retreat surrounded by majestic peaks, or a lush garden oasis with tropical flora. Incorporate large windows and open spaces that maximize natural light and capture scenic views, blurring the lines between indoor comfort and outdoor splendor.

Open-Concept Layouts and Seamless Transitions

Create an inviting atmosphere by adopting open-concept layouts that promote a sense of fluidity and connectivity throughout your home. Designate spacious areas for lounging, dining, and entertaining that seamlessly transition from one space to the next. Use versatile furniture arrangements and minimalistic décor to enhance the feeling of openness, allowing for effortless movement and relaxation reminiscent of vacation resorts.

Outdoor Living Spaces: Bringing the Vacation Home

Extend your living space outdoors with carefully designed outdoor areas that enhance the vacation experience. Incorporate expansive decks, verandas, or patios equipped with comfortable seating, dining areas, and relaxation zones. Integrate features such as outdoor kitchens, fire pits, or infinity pools to create an outdoor oasis where you can unwind, entertain guests, and savor the natural beauty of your surroundings year-round.

Coastal, Rustic, or Tropical Themes: Infusing Character and Charm

Infuse your dream home with character and charm by embracing coastal, rustic, or tropical themes inspired by your favorite vacation destinations. Choose materials, colors, and textures that evoke the ambiance of your chosen theme, such as weathered wood accents for a coastal retreat. Stone finishes for a rustic lodge, or bamboo and rattan furnishings for a tropical paradise. Incorporate décor elements like nautical accents, natural fibers, and botanical prints to enhance the vacation-inspired atmosphere.

Luxurious Amenities and Comforts

Elevate your everyday living experience with luxurious amenities and comforts that mirror those found in upscale vacation resorts. Consider features such as spa-like bathrooms with soaking tubs and rainfall showers, gourmet kitchens equipped with high-end appliances, and home automation systems that enhance convenience and efficiency. Invest in quality materials and craftsmanship to create a space that exudes sophistication and relaxation, ensuring that every moment spent at home feels like a luxurious getaway.

Sustainability and Eco-Friendly Design

Incorporate sustainable practices and eco-friendly design principles to create a home that not only enhances your well-being but also respects the environment. Utilize energy-efficient appliances, solar panels for renewable energy, and natural building materials that minimize your carbon footprint and reduce utility costs. Embrace indoor-outdoor living concepts that promote natural ventilation and connection with the outdoors, fostering a healthy and sustainable lifestyle reminiscent of eco-conscious vacation destinations.

In Conclusion

Designing a dream home that embodies vacation-style living allows you to embrace relaxation, rejuvenation, and luxury on a daily basis. By integrating natural beauty, open-concept layouts, outdoor living spaces, themed décor, luxurious amenities, and sustainable practices, you can create a sanctuary that feels like a permanent getaway. In this place, every day offers the opportunity to unwind, recharge, and indulge in the pleasures of vacation living.…

Home
basement

Designing Your Dream Den: Unique Uses for Your Home BasementDesigning Your Dream Den: Unique Uses for Your Home Basement

Are you tired of your basement being nothing more than a dark, dingy storage space? It’s time to unleash its hidden potential and transform it into the ultimate dream den! Whether you’re craving a cozy home theater, an exclusive game room, or even a luxurious spa retreat – this blog post is here to inspire you with unique uses for your home basement. Get ready to discover how this underutilized space can become the envy of all your friends and family.

Artistic Studio Retreat

art

Unleash your creative spirit by transforming your basement into an artistic studio. Whether you’re a painter, sculptor, or craft enthusiast, this space can become your private sanctuary. Ensure ample storage for supplies, consider good ventilation, and customize the layout to accommodate your specific artistic pursuits. Embrace the freedom to get messy and let your creativity flow, knowing that your basement is designed to support and inspire your artistic endeavors.

Home Theater Oasis

One of the most popular and indulgent uses for a basement is transforming it into a home theater. With advancements in audiovisual technology, creating a cinematic escape in the comfort of your home is more achievable than ever.

Invest in quality sound systems, a large screen, and plush, comfortable seating to craft a movie-watching haven. Consider soundproofing the space to minimize disruptions and immerse yourself in a true theater experience without leaving your home.

Versatile Home Office or Study

In an era where remote work and learning are becoming increasingly prevalent, dedicating your basement to a home office or study is a strategic and practical move. Utilize the space efficiently by incorporating built-in desks, ample storage, and ergonomic furniture.

Natural light may be limited in basements, so invest in proper lighting solutions from bau-welt.de/hausbau/architektur/doppelhaus-und-zweifamilienhaus/doppelhaus/buedenbender-doppelhaus.html#c55809. This often includes adding mirrors strategically to create an illusion of spaciousness. This dedicated workspace provides a quiet and focused environment, enhancing productivity and concentration.

Gym and Wellness Sanctuary

gym

Elevate your fitness routine by converting your basement into a home gym and wellness retreat. Install rubber flooring, mirrors, and proper lighting to create an energizing workout space. Consider incorporating a small spa area with a sauna or steam room for post-workout relaxation. This transformation not only promotes a healthy lifestyle but also eliminates the need for expensive gym memberships, offering convenience and privacy.

Playful Kids’ Paradise

Transform your basement into a vibrant and imaginative play area for your children. Designate sections for different activities, such as a play kitchen, arts and crafts corner, or even a mini-theater stage. Ensure the space is child-friendly with appropriate safety measures and soft flooring. This dedicated play area not only provides entertainment for your little ones but also keeps their toys and activities contained in a designated space, minimizing clutter in the main living areas.

Wine Cellar and Tasting Room

cellar

For wine enthusiasts, a basement can be transformed into a sophisticated wine cellar and tasting room. Install climate control systems to ensure the ideal conditions for wine storage. Design custom racks to display your collection and create a tasting area with a bar and comfortable seating. This elegant and functional space is perfect for entertaining guests or simply enjoying a quiet evening with your favorite vintages.

In conclusion, your home’s basement holds immense potential waiting to be unearthed. By creatively repurposing this space, you not only add functionality to your home but also enhance its overall value. Whether you opt for a cinematic escape, a productive home office, an artistic retreat, a wellness sanctuary, a wine lover’s haven, or a kids’ paradise, your basement can evolve into a dynamic and purposeful extension of your living space. Embrace the possibilities that lie beneath and transform your basement into a hidden gem that elevates your home and lifestyle.…

Home

Customization vs. Standard Designs: Finding the Right Approach for Your HomeCustomization vs. Standard Designs: Finding the Right Approach for Your Home

Embarking on the journey of building your dream home involves a pivotal decision: should you opt for a fully customized design or embrace the convenience of standard plans? It’s a choice that encompasses personal preferences, practical considerations, and the vision you hold for your ideal abode. The allure of customization lies in the ability to shape every nook and cranny according to your desires, like selecting the perfect layout, choosing unique architectural elements, and tailoring spaces to fit your lifestyle seamlessly. This path allows you to imprint your identity onto every corner of your home, ensuring that it reflects your personality and fulfills your specific needs.

Customization: Tailoring Spaces to Your Vision

visions

Customization embodies the essence of personalization. A canvas where your imagination knows no bounds. It’s the opportunity to craft every facet of your home to mirror your unique lifestyle, preferences, and aspirations. From the layout options and architectural styles highlighted at Haustechnikdialog.de to intricate details, customization allows you to sculpt a space that truly feels like home.

Pros of Customization:

  • Personalized Expression: Tailoring every aspect to your liking ensures a home that reflects your personality and meets your specific needs.
  • Optimized Functionality: Designing from scratch enables you to optimize spaces for functionality, ensuring they align perfectly with your lifestyle.
  • Unique Features: Incorporating unique elements and innovative design features makes your home stand out, exuding character and individuality.

Standard Designs: Embracing Efficiency and Familiarity

Standard designs offer a different allure. A blend of efficiency, affordability, and a touch of familiarity. These ready-made plans often come with pre-determined layouts and features, streamlining the construction process and offering a tried-and-tested blueprint for a functional home.

Pros of Standard Designs:

  • Cost-Effectiveness: Standard designs generally come at a lower cost since they are pre-designed, saving on architect fees and design complexities.
  • Faster Construction: With pre-made plans, the construction process tends to be quicker as the design is standardized and well-documented.
  • Reliability: Standard designs often come from reputable sources, ensuring structural integrity and adherence to building codes and regulations.

Finding the Balance: Which Approach Fits Your Vision?

approach

The decision between customization and standard designs boils down to finding the right balance that aligns with your vision, budget, and timeline. It’s often a matter of assessing priorities and understanding the trade-offs each approach entails.

Considerations to Help You Decide:

  1. Your Vision: How essential is it to bring your unique vision to life? Are there specific features or design elements that hold significant importance to you?
  2. Budget Constraints: What is your budget for the project? Customization often comes with added costs, while standard designs offer more cost-effective options.
  3. Timeframe: How soon do you want to move into your new home? Standard designs generally streamline the construction process, while customization might take longer due to planning and approvals.

The quest for the perfect home design involves a delicate dance between individuality and pragmatism. While customization allows you to create a space that’s uniquely yours, standard designs offer efficiency and cost savings. Ultimately, the ideal approach lies in finding the equilibrium that best suits your aspirations, constraints, and comfort. Whether it’s embracing the freedom of customization or opting for the convenience of standard plans, your dream home is a reflection of your choices, preferences, and the balance you strike between personalization and practicality.…

Home
design

Building Dream Homes: Recognizing the Signs of a Compatible ArchitectBuilding Dream Homes: Recognizing the Signs of a Compatible Architect

Welcome to our blog, where we are about to embark on an exciting journey of building dream homes. When it comes to bringing your vision to life, finding the perfect architect is crucial. After all, they are the masterminds behind turning your dreams into reality. But with so many talented professionals out there, how can you recognize signs that make an architect truly compatible with your aspirations?

In this post, we will dive deep into unveiling the key indicators that make for a harmonious partnership between you and your architect. So buckle up and get ready; we’re about to unveil the secrets of recognizing a compatible architect who will help bring your dream home from concept to completion.

Clear Understanding of Your Vision

portfolio

One of the first indicators that an architect is well-suited for your home project is their ability to grasp and articulate your vision. During initial consultations, a proficient architect will actively listen to your ideas, ask insightful questions, and demonstrate an understanding of your aesthetic preferences and functional requirements. This clear communication lays the foundation for a collaborative and successful partnership.

Proven Portfolio of Similar Projects

Reviewing an architect’s portfolio is a crucial step in evaluating their suitability for your home project. Look for a diverse range of completed projects, especially those similar in scope and style to what you envision for your home. A seasoned architect will showcase a portfolio that reflects versatility and a successful track record in translating clients’ visions into tangible, well-executed designs. For example, if you intend to construct a prefabricated home, look for a portfolio that includes such projects; visit the AZ München site to learn more.

Strong Design Aesthetic

An architect’s design aesthetic plays a pivotal role in the overall outcome of your home project. Assess their previous work to determine if their style aligns with your preferences. Skilled architects should be able to adapt their design sensibilities to suit a variety of client tastes while maintaining a cohesive and thoughtful approach to each project.

Effective Communication Skills

Effective communication is paramount in any collaborative effort, and the relationship between an architect and client is no exception. A proficient architect will not only be a good listener but also possess the ability to convey complex design concepts in a clear and accessible manner. Look for an architect who can articulate their ideas, respond promptly to inquiries, and foster open communication throughout the project.

Attention to Budgetary Constraints

A successful home project requires a delicate balance between creativity and financial prudence. An architect who demonstrates an awareness of your budgetary constraints and can work within those parameters without compromising the quality of the design is a valuable asset. This financial mindfulness ensures that the project stays on track and meets both aesthetic and financial expectations.

Thorough Knowledge of Local Building Codes

designs

Navigating the complexities of local building codes and regulations is a critical aspect of any home project. A competent architect will possess a thorough understanding of these regulations and ensure that your project adheres to all requirements. This knowledge not only streamlines the approval process but also minimizes potential setbacks and ensures the safety and compliance of your home design.

In conclusion, choosing the right architect for your home project requires a careful evaluation of their understanding of your vision, experience, design aesthetic, communication skills, budgetary awareness, knowledge of local regulations, and ability to collaborate effectively. By recognizing these signs, you can make an informed decision that sets the stage for a successful and satisfying home project. Remember, the right architect is not just a designer but a collaborative partner in turning your dreams into a tangible, well-crafted reality.…

Home
roofs

The Ultimate Handbook for DIY Roof Repairs: Tackling Different Types of Roof LeaksThe Ultimate Handbook for DIY Roof Repairs: Tackling Different Types of Roof Leaks

Are you tired of those pesky roof leaks ruining your peaceful nights and causing havoc in your home? We hear you. Whether it’s a small drip or a major downpour, dealing with roof leaks can be overwhelming. But fear not because we’re here to arm you with the ultimate handbook for DIY roof repairs.

In this comprehensive guide, we’ll walk you through tackling different types of roof leaks like a pro. Get ready to save some serious cash, unleash your inner handyman (or woman), and bid farewell to those leaky nightmares once and for all.

Identifying the Source of the Leak

Before diving into DIY repairs and learning How to Fix Your Roof, it’s imperative to identify the source of the leak accurately. Leaks can manifest in various ways – from water stains on ceilings to damp spots on walls. Ascend to your attic during daylight hours and inspect for any signs of sunlight penetrating through the roof. Use a flashlight to check for water stains or dark spots, as these often indicate the source of the leak.

Repairing Small Punctures and Holes

For small punctures or holes in your roof, a DIY solution involves using roofing cement. Clean the area around the puncture or hole and apply roofing cement generously. Smooth it out with a putty knife to create a watertight seal. This method is effective for small, isolated leaks and is a quick fix that can prevent further water infiltration.

Fixing Damaged or Missing Shingles

Damaged or missing shingles are common culprits for roof leaks. If you notice a damaged shingle, carefully lift the edges and apply roofing cement underneath. Press the shingle down to secure it in place. For missing shingles, you can use a replacement shingle secured with roofing nails. Ensure that the new shingle matches the color and material of your existing roof for a seamless repair.

Addressing Damaged Flashing

roofers

Flashing, the metal strips that seal joints and seams on your roof, can deteriorate over time, leading to leaks. To address damaged flashing, start by cleaning the affected area. Apply roofing cement to seal any gaps or cracks, and secure the flashing in place using roofing nails. Be thorough in inspecting and treating all flashing around chimneys, vents, and skylights.

Patching Roof Valley Leaks

Roof valleys, where two roof planes meet, are prone to leaks. If you identify a leak in this area, use a piece of metal flashing to create a patch. Place the patch over the affected area and secure it with roofing cement and nails. Ensure that the patch extends a few inches beyond the damaged portion to create a robust barrier against water intrusion.

Sealing Leaky Roof Vent Boots

Roof vent boots, the rubber gaskets around vent pipes, can degrade over time, leading to leaks. To address this, inspect the vent boots for cracks or damage. If you notice any issues, use roofing cement to create a tight seal around the base of the vent pipe. Apply the cement generously, ensuring that it covers the damaged area and creates a durable, watertight seal.

DIY roof repairs can be a feasible option for addressing common types of roof leaks, but it’s crucial to approach them with caution and thoroughness. While these solutions can mitigate immediate issues, it’s advisable to consult with a professional roofer for complex problems or when in doubt. Regular roof maintenance and prompt attention to leaks will help you preserve the integrity of your home and protect it from potential water damage.…

Home
constructing

Construction Innovations: The Materials Shaping Tomorrow’s BuildingsConstruction Innovations: The Materials Shaping Tomorrow’s Buildings

Today, construction materials are not just bricks and mortar, but innovative wonders that shape the buildings of tomorrow. With these materials, half-timbered houses can remain in pristine condition for years ahead, just like mentioned in WZ. From self-healing concrete to 3D-printed building materials, advancements in construction tech are revolutionizing how we design, build, and inhabit our structures. Today, let’s talk about these exciting and groundbreaking materials that are reshaping the future of construction.

Aerogel Insulation

This innovative material is changing the way we think about keeping our homes and offices comfortable. So, what exactly is aerogel? It’s a lightweight substance that is derived from gel but has been stripped of its liquid component. What remains is an incredibly porous structure composed mostly of air. This unique composition gives aerogel its impressive insulation properties.

One of the most remarkable aspects of aerogel insulation is its ability to drastically reduce heat transfer. Its high thermal resistance makes it ideal for keeping buildings warm in winter and conveniently cool in summer. In fact, aerogel can provide up to four times better insulation than traditional materials like fiberglass. Furthermore, aerogels are not only great at insulating against temperature changes but also at blocking sound transmission. Their porous nature helps absorb sound waves, making them perfect for reducing noise pollution in busy urban areas or loud industrial settings.

building

Self-Healing Concrete

Self-healing concrete incorporates tiny capsules filled with healing agents into its mixture. When cracks form due to external factors or natural wear and tear, these capsules rupture and release the healing agents into the damaged areas. The agents then react chemically with the surrounding materials, effectively repairing the cracks from within. This innovative technology not only increases the lifespan of concrete structures but also reduces maintenance costs and improves safety. By preventing water infiltration through cracked surfaces, self-healing concrete helps mitigate further damage caused by corrosion of reinforcement bars.

3D Printed Building Materials

With 3D printing, architects and engineers can create intricate designs and shapes that were once thought impossible. The process involves layering materials on top of each other, creating a solid structure from bottom to top. This eliminates the need for traditional construction methods like bricklaying or pouring concrete. Not only does 3D printing offer new design possibilities, but it also has several practical advantages. For one, it reduces waste since only the necessary amount of material is used. It also speeds up construction time significantly as large-scale structures can be printed in a small fraction of the time in comparison to using traditional methods.

Bamboo Engineered Products

Bamboo, with its incredible strength and versatility, is being hailed as the future of sustainable building materials. Engineers and architects are exploring innovative ways to use bamboo in construction projects, creating a new generation of engineered products that are not only eco-friendly but also highly durable. The best example of bamboo engineering would be the development of bamboo laminated beams. By layering thin strips of bamboo together and bonding them with adhesives, these beams can be used to create strong structural elements for buildings. Their flexibility allows for creative designs while maintaining structural integrity.

Innovation is the driving force behind progress, and the construction industry is no exception. As society continues to evolve, so do our needs and expectations for buildings that are not only functional but also sustainable, resilient, and aesthetically pleasing. The materials highlighted in this article represent just a glimpse into the future of construction.…

Home
roof

Four Most Common Mistakes Homeowners Make in Their DIY Roofing ProjectsFour Most Common Mistakes Homeowners Make in Their DIY Roofing Projects

Are you a homeowner who enjoys tackling DIY projects around the house? From painting walls to installing new fixtures, there’s something gratifying about taking matters into your own hands. A Leaking roof for homeowners can be a serious issue if left for too long. In fact, when it comes to roofing projects, there are a few common mistakes that many homeowners unknowingly make. Read this post as we explore these pitfalls and provide helpful tips to ensure your DIY roofing project succeeds.

Sealing Shingles With Poor Techniques and Tools

When it comes to sealing shingles, the techniques and tools you use can make all the difference. However, many homeowners aren’t familiar with the right techniques, which leads to ineffective results. Whether it’s applying too much or too little sealant, not properly cleaning the surface before sealing, or failing to distribute the sealant evenly, these errors can compromise the integrity of your roof.

Another pitfall is using inadequate tools for the job. While it may be tempting to reach for whatever is on hand, like a regular paintbrush or roller, this can result in an uneven application and potential leaks down the line. Investing in proper roofing brushes or rollers specifically designed for shingle sealing will ensure a more precise and thorough coating.

rain

Skipping the Use of a Professional Grade Sealant or Caulk

They may think that any sealant will do the job, but in reality, using subpar products can ultimately lead to costly repairs down the line. Using a professional-grade sealant is crucial for ensuring that your roof remains watertight and protected from leaks. These high-quality products are specifically designed to withstand extreme weather conditions and provide long-lasting durability.

By opting for cheaper alternatives or simply neglecting to use a sealant altogether, you’re putting your roof at risk. Without proper sealing, moisture can seep into cracks and crevices, leading to water damage and potentially compromising the structural integrity of your home. Furthermore, using a professional-grade caulk ensures proper adhesion between different roofing materials. This helps prevent gaps where water can penetrate and cause further damage over time.

Ignoring Insulation Like It Doesn’t Even Exist

helmetsInsulation is an often overlooked aspect of DIY roofing projects, but its importance cannot be emphasized enough. Many homeowners make the mistake of neglecting insulation or not giving it the consideration it deserves. This can have serious consequences for both your comfort and energy efficiency.

Proper insulation helps regulate temperature and prevent heat loss in your home. Without it, you may find yourself dealing with uncomfortable drafts during colder months or excessive heat buildup in the summer. Additionally, ignoring insulation can lead to higher energy bills as your HVAC system has to work harder to maintain a comfortable indoor environment.

Forgetting to Install a Drip Edge or Leak Barrier

When it comes to DIY roofing projects, forgetting to install a drip edge or leak barrier is one of the most common mistakes homeowners make. A drip edge is a metal strip installed along the edges of the roof to prevent water from seeping into the underlying materials. A leak barrier, on the other hand, is a waterproof membrane that is installed under shingles in areas prone to leaks, such as valleys and penetrations.

Forgetting to install these crucial components can have serious consequences for your roof’s durability and performance. Without a drip edge, water can accumulate along the edges of your roof, leading to rotting wood, mold growth, and even structural damage. And without a leak barrier, you run the risk of costly leaks that can result in interior damage.

By being mindful of these four common mistakes – sealing shingles with poor techniques or tools, skipping professional-grade sealants or caulks, ignoring insulation needs, and forgetting drip edges or leak barriers – homeowners can avoid costly repairs down the road while ensuring their roofs remain strong against whatever nature throws at them.…

Home
location

Telltale Signs It’s the Right Location to Buy a HomeTelltale Signs It’s the Right Location to Buy a Home

Thinking about buying a new home should never neglect the fact that the location of your dream house can simply make or break your life. After all, you want the neighborhood to be safe and convenient enough for you and your family’s needs. We talked to experts from Aurora Real Estate, and we asked them, “How do we know if a particular location is right for us?” In this blog post, we’ll share what they got to say about it and explain some telltale signs that indicate it’s the perfect place to call home. Let’s get ahead of the game.

Close Proximity to Valuable Amenities

From hospitals, schools, grocery stores, and parks to public transportation, having these amenities nearby can make daily life more delightful and save you time and money in the long run. It’s especially important if you want to grow your children or even buy a house for your golden years.

Having easy access to grocery stores makes it easier to buy fresh produce and other necessities without having to travel far from home. Parks are great places where families can spend quality time together while enjoying nature’s beauty. Living close to public transportation means that you don’t need a car for every errand or commute; this saves on gas expenses as well as reduces traffic congestion on busy roads.

Good Neighborhood Demand

neighborhood

When seeking the perfect place to call home, one crucial factor to consider is the demand of the neighborhood. A high-demand location means many people want to live in that area, which may indicate a thriving community with plenty of amenities and opportunities. What really contributes to the demand of a neighborhood is safety and security. Homebuyers are more likely to invest in an area with low crime rates and well-maintained public spaces such as sidewalks and parks.

Moreover, neighborhoods with active community associations or events foster a sense of belonging among residents. As such, it is always advisable for potential home buyers to research how lively their prospective communities are before making any commitments.

Thriving Areas

areasThese neighborhoods offer a sense of growth and development, making them an attractive place to live. One sign that an area is thriving is the presence of new businesses and restaurants. If you see many newly established shops or dining places in the area, it shows positive economic activity going on.

A thriving community can be identified through various events like festivals and street fairs held regularly around town. Such activities provide opportunities for locals to connect with one another while also showcasing what their city has to offer. Living in a thriving location not only guarantees convenience but also promises growth potential both economically and socially within your community.

Suitable Lot Location

In terms of buying a home, the location of the lot is just as important as the actual property. A suitable lot location can make all the difference in your living experience and even affect your home’s resale value. For some, even the house’s orientation can be a dealbreaker.

Is it facing east or west? This will determine how much sunlight your home will receive throughout the day. If you love natural light, you might want to look for a lot that faces east – this way; you’ll get beautiful morning sunshine. In some cultures, facing a certain direction means prosperity and wealth.

Finding the right location requires careful consideration of various factors that impact personal preferences regarding lifestyle needs and financial goals. With this guide on the telltale signs of the right place to buy a home at hand, prospective homeowners can make better-informed decisions about investing in their dream homes confidently.…

Home
room

4 Must-Have Items for Your Guest Bedroom4 Must-Have Items for Your Guest Bedroom

Whether you are expecting guests shortly or not, it’s always a good idea to have a guest bedroom ready. This room should have everything your guests might need, like extra pillows. Derila Kopfkissen is recommended by many homeowners to be placed in the guest bedroom. This is because it is one of the most comfortable pillows on the market. Here, we will discuss four must-have items for your guest bedroom. Keep reading to learn more.

Bathrobes

robeThe first item on our list is a bathrobe. This is a must-have for any guest bedroom. Your guests will appreciate having a comfortable place to relax after a long day. Bathrobes can take up a lot of space in luggage, so many guests will appreciate having one available in their room. Bathrobes are also great for those who like to take a long shower or bath. If you know your guest likes to take long showers, consider getting them a bathrobe that is extra absorbent.

Slippers

slippersThe second item on our list is slippers. Slippers are a great way to keep your feet warm and add an extra layer of comfort. You can choose to buy disposable slippers, or you can buy slippers that your guests can take home with them. Disposable slippers are a great option for those staying in your guest bedroom for a short time. If you know your guests will stay for an extended period, you may want to consider getting them slippers they can take home with them.

Blankets

The third item on our list is a blanket. Blankets are a must-have for any guest bedroom. They are great for those who get cold easily or for those who like to snuggle up in bed with a good book. You can choose to buy a blanket that is made of natural fibers, or you can choose to buy a synthetic blanket. Synthetic blankets are usually cheaper than natural fiber blankets, but they are not as durable. Depending on the weather in your area, you may want to consider getting a blanket that is suitable for the climate.

Toiletries

productsThe fourth and final item on our list is toiletries. This is a must-have for any guest bedroom. Your guests will appreciate having all of the necessay toiletries available to them. It would be best to consider getting a toothbrush, toothpaste, moruthwash, floss, and soap. You may also want to consider getting shampoo and conditioner if your guests stay for an extended period. You can either buy these items in bulk or you can buy them individually. If you know your guests have allergies, you may want to consider getting hypoallergenic toiletries.

These are just a few items you can add to your guest bedroom. By adding these items, you will be sure to make your guests feel right at home. Thanks for reading! What other items do you think are essential for a guest bedroom? Let us know in the comments below.…

Home
storage

Top Problems With Storage UnitsTop Problems With Storage Units

If you’re considering renting a storage unit, it’s important to know the top problems with storage units. Many people don’t think about the potential issues until they’re already dealing with them; by then, it can be too late. When to get a storage unit? When you’re running out of space or need to declutter your home, it might be time to get a storage unit. This blog post will discuss some of the most common problems people experience with storage units. We’ll also provide tips on how to avoid these problems altogether.

Humidity/Water Damage

unitOne of the most common problems people experience with storage units is humidity or water damage. This can happen for several reasons, such as if the unit is not properly sealed or if there is a leak in the unit. If you live in an area with high humidity, it’s important to take extra precautions to prevent this from happening. You can do this by using a dehumidifier in your unit or by keeping your belongings in airtight containers. If you do experience water damage, it’s important to act quickly. The longer you wait, the more damage will be done.

Lack of Access to Stored Materials

One of the top problems with storage units is that you may not have easy access to stored materials when you need them. For example, if you’re storing seasonal items, you may only be able to get to them a few times a year. And if you’re storing valuable or sentimental items, you may not want to risk taking them out of storage too often. The cost of renting a storage unit can add up over time, and if you’re storing valuable items, you may need to purchase insurance to protect them.

Transporting Stuff to Storage Units

storageOne of the most difficult and time-consuming tasks when it comes to storage units is transporting all of your stuff there in the first place. This can be an overwhelming process if you have many things to store. You may need to rent a truck or trailer and spend hours loading and unloading everything. And if you live in a high-rise apartment or condo, you may have to lug everything down several flights of stairs. Another problem with transporting your stuff to a storage unit is that it can be difficult to know how to pack everything so that it will fit and be well-protected.

You don’t want your belongings to get damaged in transit, so it’s important to take the time to pack everything carefully. Overall, there are a few common problems that people experience with storage units. These include humidity/water damage, lack of access to stored materials, and transporting stuff to the storage unit. However, you can avoid these problems by taking precautions and using the right tips.…

Home
backyard

Five Steps to Creating a Lovely GardenFive Steps to Creating a Lovely Garden

If you’re looking to create a beautiful garden, look no further. Perhaps discussing these five simple steps will help you get started. Whether you’re a seasoned pro or a gardening newbie, these tips will help you achieve your desired outcome. So, what are you waiting for? Get started on your dream garden today by reading tree service Webster Groves MO blogs. Let’s get started with our guide.

Keep Your Grass Shortgrass

It’s not difficult to keep your grass looking neat and tidy. All you need is a good lawnmower and some time to spare. Be sure to mow your lawn at least once a week, especially during the spring and summer months when the grass grows the fastest. If you let your grass grow too long, it will become difficult to manage. Not to mention, it will also start to look messy.

Water Your Plants Regularly

One of the most important things you can do for your plants is to water them regularly. Depending on the type of plant, they may need to be watered every day or every other day. Be sure to check the soil before watering to see if it’s dry. Overwatering can be just as harmful as not watering your plants at all.

Fertilize Your Plants

Another essential step in keeping your plants healthy is to fertilize them on a regular basis. This will help them grow strong and prevent them from becoming unhealthy. There are many different types of fertilizer available, so be sure to choose one that is right for your plants.

plants

Remove Weeds

Weeds can quickly take over your garden if you’re not careful. They compete with your plants for nutrients and can make your garden look untidy. Be sure to remove them as soon as you see them. The best way to do this is to pull them out by the roots.

Plant More Trees

plantEveryone benefits from more trees in the vicinity. Not only do they provide oxygen, but they also help cool the air and provide shade. If you have the space, consider planting a tree or two in your garden. You’ll be glad you did. Once you’ve followed these steps, it’s time to sit back and enjoy your beautiful garden. Be sure to take care of it so that it will continue to look its best. With a little bit of effort, you can have an amazing outdoor space that you can enjoy for years to come. Thanks for reading.…

Home
tube

Where to Get Water for Your Home During a DisasterWhere to Get Water for Your Home During a Disaster

When a disaster hits, it’s crucial to have a plan for getting water. The rule of thumb is to have one gallon of water daily. That means if you have a family of four, you would need at least twelve gallons of water stored up. You can check out houseilove.com for a list of the best home water filters to have. Here are various sources of water that you can use to get through a disaster:

Municipal Water Supply

flowWater from the municipal water supply is water that comes out of your taps at home. If you have a well, this water is not safe to drink during a disaster. Also, your municipality may not pump water into your home if the power is out. In this case, you will need to find another source of water. Municipal water is treated with chlorine, which will kill most bacteria. However, there may be contaminants in the water that chlorine cannot kill during a disaster. It’s important to boil your water for at least one minute to ensure it’s safe to drink.

Natural Water Sources

Natural water sources include rivers, lakes, and streams. This water is not safe to drink without treatment. Bacteria and other contaminants can make you very sick. Boiling your water for at least one minute is the best way to purify it. You can also purify water with iodine tablets or bleach. Be sure to follow the instructions on the package. If you are in a remote area and cannot boil your water, you can purify it with sunlight. Fill a clear bottle with water and place it in direct sunlight for six hours. It will kill most bacteria.

Rainwater

Rainwater is one of the best sources of water during a disaster. It’s vital to collect rainwater before the disaster hits. You can do this by placing barrels or buckets under your gutters. Be sure to clean these containers with bleach before you use them. When it rains, the water will be contaminated with bacteria. Boiling your water for at least one minute is the best way to purify it.

Melting Snow

Snow is another good source of water during a disaster. However, it’s essential to melt the snow before you drink it. It’s because snow can be polluted with bacteria from the air. Boiling your water for at least one minute is the best way to purify it. When melting snow, be sure not to use a metal pot. It will cause the water to taste metallic. Instead, use a glass or ceramic pot. When it comes to getting water during a disaster, it’s important to have a plan. The best way to ensure your family has enough water is to store it before the disaster hits. Be sure to have at least one gallon of water per person each day.…

Home
interior

Key Elements of Interior Design to Keep in Mind When Renovating Your HomeKey Elements of Interior Design to Keep in Mind When Renovating Your Home

When renovating your home, it is a must to keep the critical elements of interior design in mind. You can learn more about interior design elements to change your home at https://eluxemagazine.com. These include things like the color scheme, furniture layout, and lighting. If you neglect these elements, your renovation may not have the desired effect. In this blog post, we will discuss each of these critical elements in detail and provide tips on incorporating them into your renovation project.

Space and Furniture Layout

furnitureYou can’t ever achieve a successful home renovation project unless you always keep your home space and furniture layout in mind. It includes both the furniture and how you arrange it. You want to create a design that is both functional and aesthetically pleasing. For example, you do not wish to put your sofa in front of the window where the sun would glare on it all day. Moreover, you want to arrange your furniture to allow for easy traffic flow. You also don’t want your furniture to be too close together as it would make the space feel cramped.

Lighting

Lighting is another crucial element of interior design. It can set the mood for the entire space. You want to make sure that you have a good mix of natural and artificial light. Natural light is always best, but you also don’t want your space to be too dark. If you renovate your home, consider adding more windows or skylights to let in more natural light. You also want to make sure that you have a good mix of task and ambient lighting. Task lighting is necessary for areas like the kitchen where you need more focused light when cooking or doing other tasks. Ambient lighting is more general, and you can achieve it with things like floor lamps and table lamps.

Color Scheme

The color scheme of your home is another essential element to consider when renovating. You want to choose colors that complement each other and make the space feel cohesive. You also want to avoid using too many colors to make the room feel cluttered. A good rule of thumb is to use three colors in your color scheme. You can also use different shades of the same color to add depth and interest to the space.

Line and Pattern

patternsLine and pattern are other essential elements of interior design. The line refers to how it draws your eyes through the space. You can use lines to create a sense of movement in the area. The pattern adds visual interest and can be used to tie different design elements together. When using lines and patterns, you want to make sure that they are in balance. You don’t want one to be too overwhelming or the other to be too subtle.

These are just a few of the critical elements of interior design to keep in mind when renovating your home. If you incorporate these elements into your renovation project, you will be sure to create a functional and stylish space.…

Home
tools

No-Fail Tips to Choose the Best Roofing Contractor for Your HomeNo-Fail Tips to Choose the Best Roofing Contractor for Your Home

Your roof is one of the essential features of your home. It keeps you and your family dry and protects you from the elements. That’s why choosing the right roofing contractor, like Rhino Roofers, is so essential when it comes time for a new roof. Not all contractors are created equal, so it’s necessary to do your research before hiring one and check the reviews on their Facebook accounts. In this blog post, we will give you some tips on choosing the best roofing contractor for your home!

Get Multiple Quotes

The first step to choosing the best roofing contractor is to get multiple quotes. It will give you a good idea of what different contractors charge for their services. It will also help you weed out any overpriced contractors or too lowballing their quotes. When getting quotes, make sure you are specific about the work you want to be done. You don’t want to pay for something that isn’t necessary!

Check Licensing and Insurance

buildingBefore hiring a contractor, it’s essential to make sure they are licensed and insured. It will protect you if something goes wrong with the project. A licensed contractor will also have more experience and better handle your roofing project.

Insurance is also essential, as it will protect both you and the contractor in case of an accident. Accidents can and do happen, so it’s always best to be prepared. Make sure you ask the contractor for proof of their licensing and insurance before hiring them!

Make Sure the Roofing Contractor Can Provide a Warranty

roof structureA good roofing contractor should provide a warranty on their work. It will ensure that you are covered in the event of any issues with the new roof. It’s essential to ask the contractor about their warranty policy before hiring them. Hence, you know what to expect if something goes wrong. It’s also important to ask about their warranty policy, so you know what will happen if there are any issues after completing the project. Some contractors offer a lifetime guarantee on materials used in your roofing project. In contrast, others may provide a one-year warranty. So, be selective on it.

Meet the Contractor in Person

workersThe best way to choose a roofing contractor is by meeting with them in person. It will give you a chance to ask them any questions you have and feel for their personality. It’s also essential to check their references and see any before and after pictures of previous projects. By meeting with the contractor, you can be sure that you are making the right decision for your home.

So, there you have it! Some tips on how to choose the best roofing contractor for your home. By following these simple tips, you can be sure that you are making a wise decision and happy with the finished product. If you’re looking for a reliable and experienced contractor in the area, give us at Rhino Roofers a call!…

Home